
Welcome to Devious Designs! Every so often, we’ll post an article on how we created some of our craftiest, craziest, and most cunning props, costumes, set pieces, and much more. These designs help make a Master Mystery Production truly one-of-a-kind, and we want to share them with you. So let’s get started!
THE OPEN GRAVE

On Saturday, September 24, 2016, Pauper’s Grave, the ninth Master Mystery Production, premiered to the world as the closing act of Ridge Writers’ fourth annual Weird Weekend. One of the challenges given to the guests–The Test of Blind Faith–involved one member of our fictional families braving the secrets within an open grave. Without peering into those unknown depths, guests could only use their fingers as their eyes to divine the truth of what lay within.


How did Master Mystery Productions create this fascinating, interactive set piece? Here we show you how!

We started with a tub used to mix mortar or concrete that you can pick up at a home improvement store and a Styrofoam tombstone found at many stores around Halloween. We chose a tombstone without any identifying name or markers and kept it simple and generic so as not to interfere with any of the story elements, but you can choose whatever decoration you want.
One of our major difficulties was that we couldn’t make any of our grave design permanent. The tub we used is recycled for many other Master Mystery Productions. We used it as the capsule desert crime scene for 2015’s Hello Out There, and we plan to use it again for other projects. After washing the tub, we inserted a steel rod into the Styrofoam tombstone and slotted it into a hole already present on the rim of the tub. Then we used string and duct tape to anchor the tombstone in place.

Complex? Yes. But remember, we had to install it in a way that would make it easy to remove and keep the tub intact for future projects.

Next we had to simulate the grave soil our brave audience had to plunge their hands into. We set out to create something similar to the classic Halloween game where one guesses what body part is in the bowl or box without looking (when it is usually things like peeled grapes or spaghetti). So the interior of the tub had to be empty save for the clue we wanted guests to decipher. Our soil had to be just a film on top that players would reach through to get to the clue. First, we used spray adhesive on the rim of the tub to help adhere our plastic film to it. Spray adhesive can be removed with products such as Goo-B-Gone, so we were okay with using it for this.

Our plastic film? A simple black trash bag we stretched over the opening of the tub and glued down with the spray adhesive. This would be the surface where we would create our soil and vegetation without interfering with the clue or getting the audience’s hands dirty.

The first layer to create the soil was a layer of tan paint we rolled on. This gave our textured material something to stick to when applied.

What looks the most like dirt? Dirt! Specifically, a finer sand that would visually scale up to read as denser soil. We spread a fine layer of sand on top of the paint to create the realistic texture we wanted.


We then sprayed a darker, espresso brown color paint on top of the sand to simulate the richer, deeper soil color of England where the story takes place. Then we sealed it with spray adhesive and let the whole thing dry overnight.


The following day, we began with trimming the excess plastic along the rim of the tub to clean up the edges…


…and then we cut a slit in the center of the plastic. This was the slit guests would stick their hands into to find the clue.
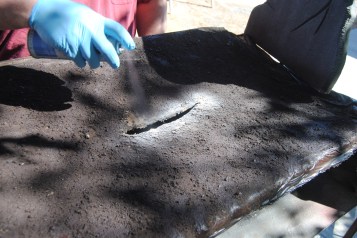
We used spray adhesive again to seal the edges of the slit. Throughout this, we would touch up the paint on the soil.

As an added touch to finish off the edges of our open grave, we assembled these fence pieces we purchased. Similar fences can be found in Halloween decorations and are used to create boundaries for pretend cemeteries. The fence pieces easily interlocked and were lightweight, allowing us to lift the whole fence up and over the grave for quick assembly and strike.
Now came the artistic embellishments, taking our grave and styling, aging, and decorating it to fit the theme and mood of Pauper’s Grave.
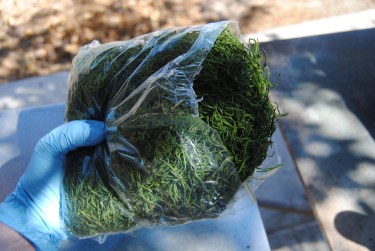
We wanted the grave to look at home in a Gothic cemetery, a broken, overgrown relic you would discover on a foggy night. Starting with this decorative Spanish moss you can find at craft stores, we tore off large chunks of the moss, leaving long tendrils, and we used spray adhesive and craft glue to attach it to the “soil” and the tombstone. We made sure the tendrils stretched across the soil to give the illusion of the grave being overgrown.


Then we aged the tombstone. Using a mix of heavily diluted black acrylic paint in water, we highlighted the lettering and cracks on the tombstone, letting the paint drip from the letters in a subtly creepy fashion.


We added some splatters of the paint across the face of stone, simulating mold spots and other signs of aging on the stone itself. This gave the tombstone more realism. Using the watered down paint allowed it to dry to different levels of darkness, depending on how thick the paint went on the stone. This created interesting layering effects that further enhanced the realism of the aging. We didn’t worry about being perfect. We let the paint land where it wanted.

We used a light dusting a brown spray paint on the moss to make it look more natural and withered. Then we added some spots of spray paint in a color called Oil-Rubbed Bronze. This added interest and variation in the soil color. Because the color is metallic with a slight shimmer,it made the soil appear wet or freshly turned, enhancing the open feel to our makeshift grave. A final coat of spray adhesive to seal the whole set-up and a couple days to dry and set, and the grave was finished, ready for the show!

Et voila! The finished project! It was very lightweight and not too difficult to maneuver. Assembly was a snap. Place the grave where you want it, place the fence around it, place the surprise inside the grave through the slit (in this case, a clue to the mystery), and presto! You’re done!
Guests will wonder and propose theories of what lies within the grave and you may find a line of people wanting to brave its secrets. And it certainly makes for a unique photo-op! Make one for your next Halloween party and surprise all your guests.

Hope you enjoyed this Devious Design and we’ll see you for our next mystery!
–Master Mystery Productions

This is a really creative and engaging way to design an interactive set piece.
LikeLike